Monday, January 31, 2011

Another floating frame

I usually dont make any decorations for Valentine's day simply because isn't a big deal in Europe like it is in the States but I wanted to make another floating frame and couldn't think of anything else to put on the squares. This time I used cardboard like from a cereal box and used mod modge to cover it with scrapbook paper. I still sanded the edges (carefully) and inked the edges with red and black distress ink.

I'm not all that proud of my frame decorations but I couldn't leave the house to get supplies that I wanted to I used what I had on hand. I might make some changes if I can think of anything else. But I just wanted to show you that it looks just as good with really thick cardboard as it does with really thin cardboard which makes this a simple and cheap project!
I was more careful this time not to leave glue strings caught inside the frame. Now I need to find a place to put it! (sorry for the awful picture quality, my camera isn't great and the lighting in my living room is terrible most of the time because of the weather!)

Sunday, January 30, 2011

Branches

For my winter decorations I chose to go with light blue, silver and white this year. One of the things I wanted was to try out something I was planning to do at my future sister in law's wedding this summer with branches, flowers and butterflies. I gave it a go after going through the forest to find some dead branches! It was so much fun to make. I bought some cheap white fabric flowers that were on sale and just painted them with acrylic paint the color that I wanted. I bought a butterfly mobile for about 2 dollars ( at VIMA in France) and just used the individual butterflies. I also found some nice clear plastic beads to hang from the branches. I gathered my decorations and my glue gun and went to work. I really liked my finish product and ended up putting it on my living room table....after a few weeks of walking past it all the time and having to remove it every time we had visitors over for dinner I noticed that it was a bit of a pain. The branches were quite long (reminded me of spiders legs..) and I started to think, if we have this on all the tables at the wedding every time someone stands up he's going to get pocked in the eye!! Oh, and the kids would love it:) So it had to go...sadly.
But luckily I found a new use for it. I have these cute shelves that I asked my Dad to make for me and I couldn't find anything really nice to put on them, I kept making new things to display on the shelves and I'd get sick of them after a few hours. So instead of throwing out my long branches...I cut them and put them in these tiny candle glasses!
Now I can finally walk down my hallway and feel content:)

Saturday, January 29, 2011

Floating frame

I discovered floating frames the other day while I was browsing through other craft blogs. I had a project to make wood blocks with presiden't Hinkley's 6 Bs on them and that gave me an idea. This is how it turned out:

Here's how to make this
Supplies:
a frame with an extra glass insert (hobby stores usually sell those really cheap)
get a frame with a nice thick cardboard backing that you can use for your squares
a hand saw
craft knifescrapbook paper
sand paper
mod podge
vinyl words
ink for edges (optional)
ribbon (optional)glue gun...not optional!

1. I started by using one of the blocks I had originally planned on decorating as a guide to trace my squares (they measured about 5.5 cmX5.5cm and my frame measured 20.5X25.5 cm).

2. use your hand saw for the easy lines.
3. use your craft knife for the rest. I didn't cut all the way through with my knife, I just cut a bit and then bent it till it snapped, I didn't really care to have even edges.
4. Choose your paper and trace your squares on the back of your paper and cut them out.
5. cover your cardboard with mod podge (you can't find this in europe so I just use the glue they sell for découpage or technique de serviette from UHU)
6. place your squares face down and let them dry about 10 minutes. My cardboard was white on the other side but I used the sand color side for my paper because once I sanded the edges I wanted the 'wood color' to show!
7. Sand your edges as much or as little as you like and ink the edges if you want.
8. Stick your vinyl on your squares.9. Take a glass insert and hot glue your squares where you want them. Add ribbon if you like, I think it adds a nice little touch to the whole project. Very important..remove all the little strings of glue that might be on the glass...I didn't do it properly and now it looks like my glass is cracked!
10. Place the second insert into your frame first and then add the one with your squares. Hot glue all the corners and edges of your frame so the glass doesn't fall off!! once again remove glue strings!
This project didn't cost me a thing because I already had all my materials on hand, I'm always on the look out for cute and cheap frames because I know I'll always ended up finding a good use for them. What I did in this case was paint my frame brown, I almost always paint my frames to suit the color pallet of my project instead of buying a frame that's already the right color.

Thursday, January 27, 2011

DIY 'Home Sweet Home' plaque

I love wood, it's just so much warmer than metal, modern furniture just wouldn't be for me I'm afraid. I've been wanting to make a nice wooden plaque with 'Home Sweet Home' written on it for a while now but you can't get nice plaques here so I decided to make it myself. It's not complicated you just need a few inexpensive tools:)
Supplies:
* hand saw
* miter box (there are some really cheap ones out there but of course Metal is best) this will help you cut at an angle
* wood glue
* piece of wood and enough molding to go around your wood
* straps to hold wood together while it dries
* wood filler
* paint
* words you want on your plaque printed on copier paper
* a pencil

1. Cut your molding (french: Moulures --leroy merlin a des bon prix) with your miter box to fit around your wood plaque.
2.Use your wood glue to glue the molding in place and hold it together with simple straps. By the way, you can only use wood glue if your wood still hasn't got any varnish or paint on it! Wood glue is very cheap, you dont need to get the expensive stuff, I bought mine at COOP Bau und Hobby in Switzerland for about 5 dollars. I let the longer sides dry longer than the shorter sides. and for the shorter sides I just held it together with my hands the first minute while they dried because my straps weren't long enough to go around the long side of my wood:)

3.You might have some spaces between the molding and your wood (especially in the corners), if that is the case this is where the wood paste or wood filler comes in handy. Sadly that is not very cheap and comes in a tiny tube. It is easy to use, just read the instructions on the back and start filling those holes!
4.Once that's done you are then ready to paint your wood. I'm having a brown phase by the way:)
5.I printed out my letters making sure they would fit nicely on my wood.
6.Then with the flat side of a pencil color the back side of your paper so it's nice and dark!
7.Then tape your words exactly where you want them, use a ruler if you have to because you wont be happy if your words are a bit crooked at the end! Then go over the outline of all the letters with a sharp pencil, a skewer might work too I think.
8. You can sort of see the word 'Home', I always go over all the letters with my pencil again because otherwise they tend to fade away after a bit, especially if you dont have time to paint it right away!
9.You're last step is to paint the inside of all the letters, this project took me about 90 minutes to paint, I usually let my husband choose a movie he wants to watch and I sit with him and paint:) You can either use a thin paintbrush (I have finally found a good one) but you can also use a toothpick or skewer. I've found that I can be more precise with a skewer than a brush but it also takes more time and concentration. In both cases your letters wont be perfect like when you're cutting out letters with your cutting machine but I like that it looks more hand made that way:)

Here are two other projects I did with the same word transfer system and painting! The first one is a gift I made for my dad for Christmas, it has his birth year as well as my moms, the year of their wedding and the year their kids were born. I left room for adding Grand kids at the bottom:)
Here's one I made for our hallway. The wood is actually a piece of fence for balconies that I found in France for less than 4 dollars (un morceau de balustrade)!

Sunday, January 23, 2011

Using contact paper instead of vinyl! Part 2

In this tutorial I will show you how to use contact paper with your electronic cutting machine and how to make decorative wooden blocks!

My youngest brother is coming home from a 2 year Chinese speaking mission for the Church of Jesus Christ of Latter Day Saints in just a couple of weeks. The day he returns happens to be Chinese new years so I thought I'd prepare a small surprise party. I thought I'd make a block with a Chinese character to put next to each plate. Here's how to make the blocks.
You'll need:
Square wooden blocks (I needed 7)
sand paper
acrylic paint
colored contact paper
(electronic cutting machine)
clear contact paper


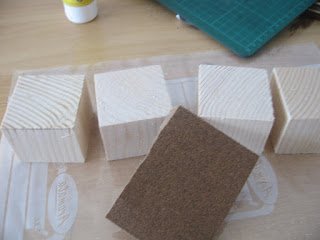
Start by sanding the edges of your blocks to make sure they are smooth.
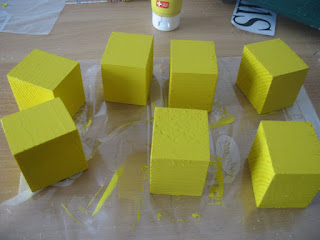
Paint them whatever color you want (I used bright yellow for my Chinese theme), I like to work with acrylic paint because it is so easy to mix colors to get the exact color you want...with a little bit of practice:)
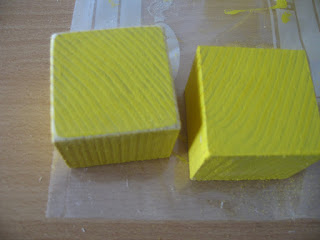
Once your coat of paint is dry, you can leave your blocks as they are but I like to sand the edges again to give them that aged look.
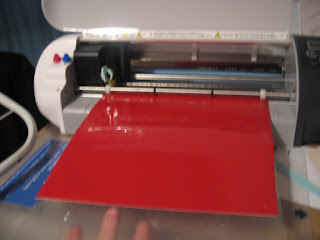
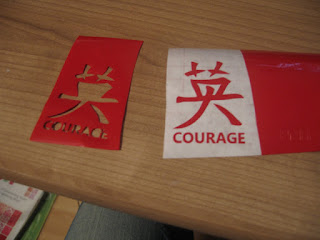
Then I downloaded the images I wanted from the silhouette online store and adjusted the images to fit my blocks. I stuck the contact paper (with the backing) on the carrier sheet I made and put it through the silhouette: I use the yellow cap and tell the program that I am using silhouette vinyl.
You can see exactly the cut out shape, so what you do now is remove the excess adhesive so there is only your shape left on the backing paper.
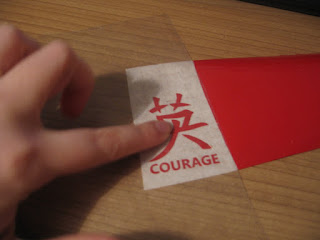
This is where the clear contact paper is needed, I cut a strip a bit bigger than the shape I'm cutting and remove the backing paper. I then try to take out as much stickiness as I can by rubbing it on a cotton shirt. Then I lay it onto my image and rub across it with my finger.
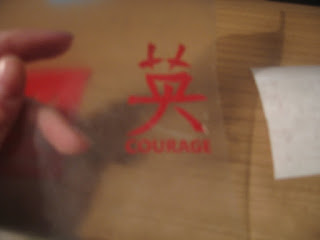
I then lift the clear contact paper, the image should be stuck to it and come off from the backing paper it was on. This will ensure that your image (especially those with lots of parts on them) stay straight when you transfer it to you block.
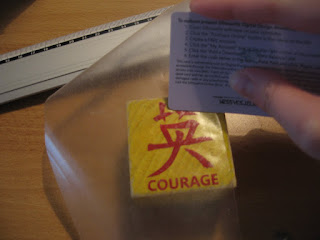
Lay the image sticky side down on your block and rub the image with a credit card or bone folder.
Then CAREFULLY remove the clear contact paper, you might have to hold down pieces of your image onto the block so it doesn't stick to the clear contact paper instead of your block. There you go! One block done, six more to go:)

Friday, January 21, 2011

Using contact paper instead of vinyl! Part 1

Before I had the silhouette I found various ways to make my own letters and numbers to stick on blocks like this Christmas count down set. The best thing I found was to use contact paper (French: film de protection adhésif) which is self adhesive and comes in a bunch of different colors and you can usually find quite cheap ones too (in France I get them at VIMA where they cost less than 4 euros!).This is what contact paper looks like, it always comes in a roll and what I like about this technique is that you waste very litlle of the stuff on your projects so a roll can last a very long time:) (the contact paper in the picture is clear by the way)
So to start just open a word document and choose the font, font size and words you want to have on your project and print them out on normal thin printer paper (the thinner it is, the easier it will be to cut it precisely)
Cut out the letters with a simple pair of scissors.


For the inside of the letters such as the B and the e I used my craft knife to gently cut those out.

Then take your contact paper (I used black), shiny side down and trace your letters on to the back of the contact paper (the side that is actually made of paper!), be sure to invert the letters so if you printed your text out in black make sure the black side is facing down....otherwise you'll have to trace it again...I learned the hard way.Then use your scissors to cut the letters out again and for the inside use your craft knife again. Once you get the hang of it the craft knife is quite easy to use, I find that rotating the paper instead of the the knife works best. Then you just need to remove the backing and stick it onto your project!

Thursday, January 20, 2011

Diaper cakes

Diaper cakes are a lot of fun to make and are great as centerpieces for a baby shower or a just a s gift for a new born.


Supplies:
*about 75 diapers
*75 medium rubber bands
*3 large rubber bands
*a tall but narrow baby bottle (filled with candy:)
*little gifts: baby lotion, wipes, soothers, stuffed animal, hat, mittens
*Ribbons and embellishments
*Hot glue gun (optional)
*Piece of cardboard to hold the cake
*Clear wrapping paper

Start by rolling up all the diapers individually and fastening them with a rubber band.
Fill the bottle with candy.

The bottle will be the center of you cake, surround it with rolled up diapers and put a large rubber band around them, then start stuffing until you have about 3 even rows of diapers for the bottom layer. Use the same process for the second layer but you will only have two rows of diapers. For the last layer roll up your three burp cloths and hold them on the center of your second layer and add a row of diapers around them with the last large rubber band.
To hide the rubber bands add ribbon around each layer, you can either tie a knot in the back, make a bow or use your hot glue gun to fasten the ribbon to the cake. You can then squeeze little gifts into the sides of the tower or use more ribbon to fasten the soothers for instance. I like to put the stuffed animal (a hat works well too) on the top of the cake. Then to finish cut your cardboard on the bottom to the right size so it doesn't stick out too much and wrap the whole tower in clear wrapping paper! Voila!